Author: benjonesdev
Week 9-10: Mobile Security
This week’s topic was mobile security. Mobile devices are ubiquitous now, but once were a niche technology. The beginning of the lecture covered the evolution of mobile devices, from a $4000 cell phone with 30 minutes of talk time from 1984 to current Android and iOS devices. The stats from the lecture showed that Android share has been growing and has ~40% market share while iOS has ~20%. This was surprising because I thought that the marketshare for both would be larger. This may be because the statistics are dated and reflect international subscribers. A post on statista.com shows that in the United States today, 54% of smartphone users are on Android and 44% are on iOS.
Another point that was made in lecture was how different the mobile platforms are from each other. Exploits are limited to one platform since the kernel, programming language, executable file format, and app compiled code is different. Each mobile OS also has its own security features. Android marketplace automates application review while iOS has manual approval for the Apple store. Likewise, Android apps are self-signed while iOS apps have vendor-controlled signing.
It’s also possible to bypass system security features on each platform. iOS devices can be jailbroken, which opens security backdoors. Jailbreaking an iOS device allows it to run software not authorized by Apple. Similarly, Android devices can be rooted, which means gaining root privileges so that the user can run privileged actions, such as removing pre-installed applications or bypassing restrictions from carriers and manufacturers.
We also went over a brief history of mobile exploits. Two of the first malware exploits, Epoc.Fake and SymbOS.Cabir used bluetooth for distribution. This is interesting to me because bluetooth is not a technology that we think about too much in our day to day, especially when these exploited came out in 2000 and 2004, and they spread with relatively close physical proximity like a biological virus. Most of the time, when you think of a computer virus or malware, you think of it coming from the internet. Who would have thought, back then, that your phone could “catch a cold” from neighboring “sick” mobile devices. But it wasn’t until 2007 that mobile malware was actually used for financial gain by the writers. SymbOS.Viver would send text messages from infected devices to premium numbers and collect the fees incurred by the infected users.
One of the biggest Android exploits was DroidDream. Apps were repackaged with this exploit and uploaded to the Android Market. It attempted to root the device using two publicly discussed exploits, “exploid” and “rageagainstthiscage”. Once rooted, it installed its APK in the system files, masquerading as sqlite.db, and started downloading additional applications. This was the discovered exploit on the Android Marketplace and had between 50K and 200K installs in four days. In order to reverse the damage done by this malware, the applications found to contain this exploit were remotely removed the software from affected devices. This required automatic download of an “Android Market Security Tool” app. Funnily enough, malware authors took advantage of this and repackaged this app with malicious code in an exploit named BgServ.
In the static analysis lab we were given two files to examine. One of the ways we can get information about the malware is by taking an md5sum of the suspect file and then look it up on Virus Total. The links to download the files were broken, but I was able to look up the hash and find the following match. It is the FakePlayer malware.

Above is a screenshot from VirusTotal for the FakePlayer details page. The first suspicious detail is that the application has permissions to send text messages. It is unlikely that a media player would need to have texting permissions. But even more suspicious is that the ONLY permission that the application needs is SEND_SMS. Additionally, the certificate for the app is issued by Android Debug, which is the default certificate created by the build tools and insecure.
We can also look at the .smali file and perform static analysis. The .smali file is a mix between the DEX file and the Java source. We can follow the logic and structure of the Android application here. We can modify the smali file, recompile the application with the same APK tools used to decompile, regenerate the APK file, sign it, and run it again – so reverse engineering is possible.
For the dynamic analysis portion of the lab, we used Android Device manager – an Android emulator to examine the malware samples. We can log the network traffic into a pcap file and use Wireshark to analyze the network traffic. We opened two instances of Android emulators, and added one phone as a contact of the other. Then, we fired up the malware program. After launching the malware application on the first Android instance, the second Android instance received a text message shaming the first user for downloading a pirated app.

Week 8 Writeup
This week’s material covered email security.
Exercise 1 – Poking around in PostgreSQL
On the linux VM, we are given access to a Postgres database containing records containing emails that have been classified as spam or ham (legit email). There are 100,000 emails in this database, as shown from a “SELECT COUNT(*) FROM message_data;”.


\d shows a list of relations


The inconsistent alignment of the columns is hard to read.
If these emails had not already been labeled is_spam, we would be tasked with classifying the emails. This can be done using a rule-based system so that emails that meet a certain set of rules will be marked as spam. These rules may not necessarily cover all cases of spam, but email spam filters philosophically would rather allow more spam through if it means that legit email is not blocked. The consequences of more spam is most likely the inconvenience of a fuller inbox. However, if business critical emails are being blocked, then blocking this email is an application-breaking bug.
Exercise 2
Writing rules to classify emails is similar to writing YARA rules previously in class. We look through the contents of the emails for patterns that are suspicious, like how we examined the string contents of executables for suspicious contents. One of the tools we can use to classify emails is regular expressions. While not directly applicable to classifying emails in the db format we looked at in the previous exercise, it was fun to practice regular expressions.

We were tasked with writing a regular expression rule to match the three obfuscated spellings of Viagra but not match “Viagra” itself. I used the “g” and “i” flags for my expression. The “g” flag is for a global search or matching all occurrences and the “i” flag will make the match case insensitive. The first part of the expression “(?!Viagra) will match the string after “!” but ignore it and continue with the rest of the match. I used the pipe operator like an “or” to select between different possibilities for a match. For example, matching V or \/. The (\s*) will match 0 or more whitespace characters. This can also be limited by using curly braces to specify a range of characters to match. (\s*) might match 1000 spaces but it may not be practical to test for that match given our original set of strings.
CS 373 – Week 7
This week covered web security.
Lab 1
Lab 1 explored attacking web vulnerabilities using WebGoat. WebGoat is a deliberately insecure web application used to teach about web vulnerabilities. It is maintained by OWASP. After starting WebGoat on the Linux VM, we are able to navigate the web app and explore various lessons with interactive lab exercises.

The first attack we are exploring is Stored Cross Site Scripting. An XSS attack is when malicious code is injected into otherwise trusted websites and the injected code is used by another user. In this case we are exploring a Stored XSS attack, which means that the injected code is being stored in the web application database and served to other users.

We are given a web portal and logins for different users. We want to launch a stored XSS attack against the “Street” filed in the “Edit Profile” page from the user Tom, so that the user Jerry is affected by the attack.

After logging in as Tom, we edit his address in his profile so that it contains <script>alert(‘Hey Jerry’);</script> instead of a legitimate address. This will then be stored in the database so that when his profile is viewed, the script with be ran and print the alert.

We can confirm this by logging in to Jerry’s account and viewing Tom’s profile. See the above image.

The second attack we explored was the Improper Error Handling (Fail Open) Attack. We are given a login page that accepts a username and password. This challenge was difficult and I had to check out the hints to solve it. My first approach was to use the Tamper Data plugin we had installed for this lab to change the data being submitted, changing the Username, Password, and Submit fields in the POST. I also tried changing the Cookie and Referrer headers without success.

After looking at the back end Java code, it appeared that in the catch block we could be authenticated if a parameter in the form was omitted. Since there are also checks that the username is not blank, we must omit the password parameter. The full solution shows using a program called web scarab to modify the post request and delete the password parameter but I was not able to replicate this functionality in the Tamper Data plugin we installed.

So instead of deleting the Password parameter in the request itself, I went into the page inspector and changed the name of the Password parameter to NotPassword. Now, when the Java parser tries to retrieve the password parameter, it will throw an exception because it cannot find it, leading to the makeSuccess() function being called and webgoat being logged in.


The final attack in this lab was the Numeric SQL injection attack. The sample page include a drop down where we can select different cities in the United States and then print their weather data in a table. The site also shows the SQL query made to the database above the table.

When viewing the POST request in Tamper data, we can see that a station parameter is being sent to backend where a SQL query is being made to get information for that city. This parameter is being substituted at the end of the SQL query: “SELECT * from weather_data WHERE station = “. So, we can complete this query, add a semicolon, and then add a second query to print all the data in the table. Our new station parameter would be “101; SELECT * from weather_data;”.

Now the results page shows that our second query was made after the first and all the cities in the weather_data table are displayed. Interestingly, there are two cities not listed in the drop down that we now can see data for. In a production application, this kind of attack may lead to even more sensitive data being breached, such as user passwords or financial data.
CS 373 – Week 6 Writeup
This week, we focused on network security. Why is network security important? It can help keep dangerous hosts and data out of a network, prevent retrieval of sensitive information, and protect hosts without self-protection such as IoT devices, hosts that run on legacy software, and mobile devices.
The robustness principle is was published by Jonathan Postel in RFC 1122:
“Be liberal in what you accept, and conservative in what you send”
Postel’s principle is applicable today, just as when it was written in 1998. with some considerations for certain industries or applications. Upon first glance, it may seem like the first part of the principle addressing what a network should accept is too inclusive. This was my impression. Shouldn’t we be wary of malevolent actors that will exploit any opportunity to breach my network? But in the RFC, Postel cautions that we should “assume that the network is filled with malevolent entities that will send in packets designed to have the worst possible effect. ” He is by no means advocating for free and open network policies (though RFC 2468 does describe him as a hippie). His principle is mostly referring to the ability of programs to work under any conditions. The example he uses in his RFC 1122 is that a program using a protocol with an attribute with 4 expected values should not crash if it encounters a fifth value. The second part of the principle describes how hosts should communicate with each other. It is better to go with tried and true applications of protocols than to use legitimate but perhaps more obscure features of a protocol that may result in unintended results.
This week we revisited the Man in the Middle attack. Typically, the man in the middle attack is performed by a malicious actor intercepting communications between two unsuspecting hosts, usually named Alice and Bob. Then, a malicious actor can eavesdrop between the two, change message in transit, or pretend to be one host to another host. How does a malicious actor start a man in the middle attack? One way is a technique called address resolution protocol (ARP) poisoning where the malicious host floods the network with ARP responses. This fools hosts into think that your MAC address corresponds to the network gateway. Then, hosts will begin sending their packets to you. Another technique to perform a man in the middle attack is TCP hijacking where an attacker can inject, create, and change data in a TCP stream. One of the interesting points raised is that there is actually “good” man in the middle behavior as well such as the case of proxies, which intercept outgoing traffic and rewrite packet headers so attackers can’t transmit protocol attacks. An HTTP proxy can also intercept dangerous traffic and prevent connections to dangerous hosts.
CS 373 – Week 5
This week’s material covers Windows internals and rootkits. A rootkit is a collection of malicious software that enables access to areas not otherwise allowed and often masks its own existence. What makes rootkits so devious is that they conceal themselves. The prevalence of rootkits peaked in the 2000s, but there are still new rootkits being released today. The decline in their popularity can be attributed to new security measures in modern operating systems that prevent unrestricted kernel access, like checking for valid digital signatures for all drivers.
Rootkits operate at the kernel level. The other level is the user level where .exe and .dll files live. The kernel level operates on .sys files. Kernel mode gives more access to system features. Kernel memory, for example, has no security separation and any kernel driver can access any system memory. If a rootkit is able to compromise kernel memory, it can wreak havoc on a system.
Lab 1
The first lab this week has us analyzing a piece of malware named Agony. First, we run the malware using Cuckoo to see what files are created by the executable. After running analyzer.py, the binary files that were created are captured in a files directory. This is handy to know, as last time we used Cuckoo in a lab, I went through the log file manually to check for files that were created. The three binary files created were: bad.bin, tzres.dll, and sortdefault.nls.bin.

The windows list directory command, dir, calls different APIs depending on the parameters it is given. Running dir *.* in the analyzer folder does not list any .sys files. However, running dir *.sys reveals that a wininit.sys file is in the directory. The first command normally should show the sys file. This is evidence that the rootkit has changed something about the dir *.* command.

Next, we use the Tuluka tool to analyze what the malware has done. We navigate to the SST tab and sort the functions by “suspicious”. Three suspicious functions are listed: NtEnumerateValueKey, NtQueryDirectoryFile, and NtQuerySystemInformation. The NtQueryDirectoryFile in particular is called when calling dir *.*. This has been modified to call a different API that hides .sys files.

Windows explorer also uses the dir *.* to show files and the wininit.sys file is not shown in explorer either. Since antivirus also use user-level API calls like dir *.*, this file would be concealed to these types of programs as well.

The next part of the lab used LiveKD to analyze the new code pointed to at the current location of these three functions. These functions now point to wininit plus some offset. This new code that has replaced the function is responsible for hiding the .sys file. If we go back into Tuluka and use the restore service on this function, we can revert this function to its original code and see the .sys file in the analyzer folder again.


This malware needs to be smart enough to find the original address of the NtQueryDirectoryFile, hook itself, and properly patch back. The lecturer referenced an example of a food supply line between two people and a bad actor who would filter all the bananas that passed between the two people. The bad actor cannot just filter all the food because would lead to detection, but if he only takes bananas and redirects the rest of the food to the second person, it is possible to avoid detection. This is similar to our malware because it needs to swap the pointer to the original NtQueryDirectoryFile code in the System Service Descriptor Table (SSDT) and change it to malicious code. Then, the malicious code need to patch back to the original code. If the malware was not properly patched back into the original address, it might lead to blue screens or other errors that would lead to detection.
Lab 2
This lab examines the zbot malware sample using ProcessHacker. The zbot malware is a key stroke capturing malware. After unzipping the malware.exe file to desktop and running Notepad, we checked ProcessHacker to see what changes were made to memory.

When examining the memory used by Notepad, we can sort by permissions. If there was some malware added to the memory of the program, I would expect that there is some sort of executable code injected. Looking at the memory for Notepad, I saw suspicious unnamed files (Private (Commit)) with read/write and read/write/execute permissions. Legitimate DLL files would have names.

Now that the malicious code is hooked into the Notepad memory with read/write/execute permissions, it can capture our key strokes.’
Lab 3
This lab covered live kernel debugging. First, we establish a connection between the debugger machine and the debuggee machine using WinDbg.


We can determine the size of the hooked malicious code by subtracting the call to the NtEnumerateValueKey original code and the address where the malware has hooked. On the debuggee machine, the hooked malicious code starts at 9d52a480 as shown in Tuluka below. So we set a breakpoint here in in WinDbg then step through each instruction until we get to a call instruction that returns us to the original address of the NtEnumerateValueKey API call. This address of the call instruction is at 9d52a480 as shown in the WinDbg screenshot below. By subtracting the addresses, we get 54h or 84 bytes in decimal, the length of the malicious code hooked in this Windows API call.


Lab 4
Now we can patch the change in the KiServiceTable to restore the address of the original code for NtEvaluateValueKey. Ultimately, we want to see that the NtEnumerateValueKey function is no longer suspicious in Teluka. By typing the command, dps nt!KiServiceTAble L191, we can see the table with the addresses for each function. Now we just need to find memory containing 9d52a480 and change it to 82e85a0f. It is important to note that the address is stored in little endian.


Since the malicious code is no longer referenced in memory, it will no longer be executed once the table is patched. However, we are lucky that this is enough to disable the rootkit. The lecturer mentioned that some rootkits will un-patch the addresses back to malicious ones.
Week 4 Writeup
This week is all about hacking. What is hacking? It’s about thinking what the developer didn’t think about and using it to your advantage. You can find bugs in a program, alter the behavior of the program, and then get access to the program. You could also discover vulnerabilities in the configuration settings such as weak passwords and use this to your advantage. Improper input validation can also lead to programs overwriting the stack with user input that can give him or her control of your program.
Recently, there has been a shift in hacking. Before, most attacks came from the internet and targeted a company’s DMZ or border systems (website or email servers). Now, the focus of attacks is on individual users, using techniques like phishing to gain control of an internal users computer to begin an attack on the whole system.
Taking advantage of a vulnerability has two parts. The first part is the vulnerability trigger where the user invokes a software bug that gives control to the user. The second part is the payload, which is the code that performs a desired action after control is obtained – this is usually shell code. One of the common payloads is shell code to run the Windows calculator to demonstrate that control of the system has be obtained.
The second lecture from this week introduced us to the program WinDbg. WinDbg is a debugging program similar to gdb that can be used to step through a program and examine registers and memory.
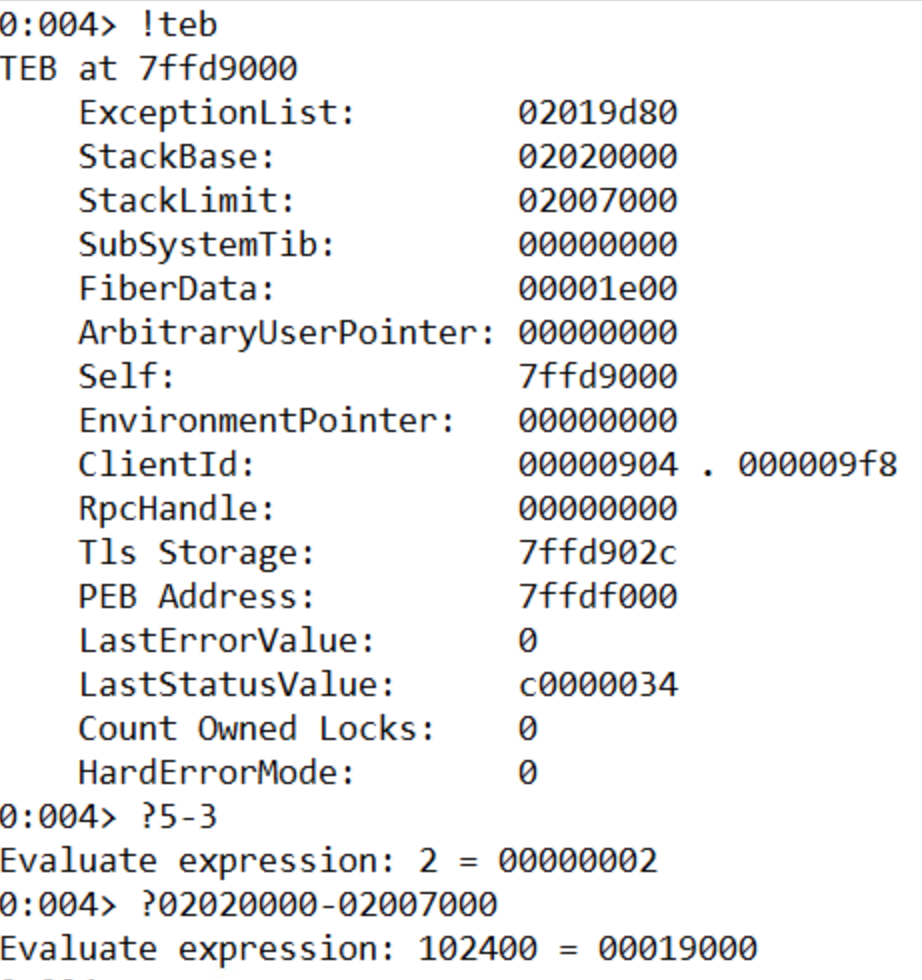
For the first lab, we are instructed to place attach Windbg to the second internet explorer process, set a breakpoint at 54431df0, and then click a link to trigger the breakpoint.
1. What address is FSExploitMe.ocx loaded at?
We can find this by using the list loaded modules command (lmf) to display the addresses for the loaded modules. We can see from the screenshot below that FSExploitMe is loaded at address 54430000.

2. How large is the stack?
We can find out the size of the stack by using the !teb command to list information about the stack and then subtracting the Stack Limit from the Stack Base. A cool feature of Windbg is that it can evaluate math operations in the console directly by prefacing the expression with ‘?’. The size of the stack is 19000.
3. What is the starting address of the process heap?
The starting address of the process heap is 2e0000. This can be found by typing the !peb command into the console and looking for the Process Heap label.

4. What is the value of EIP?
The value of EIP is 54431df0. This is where we set the breakpoint.
5. Issue the command “u eip L10” – how much space is allocated for local variables on the stack?
The memory allocated for local variables is subtracted from ESP at the beginning of the function. This is 14h or 20 bytes.

6. Execute 5 instructions with t 5. What is the string pointed to at the top of the stack?
Dumping the unicode text at the ESP pointer after running t 5 shows that the string at the stop of the stack is “FluffyBunniesDontFlapOrQuack”. It’s important to use the poi() function to take the value stored at that address instead of the address itself. As seen below, “du esp” leads to unexpected results. Also, using da instead will be expecting ascii characters and will only list the first character (F) of the unicode string since in ascii when 8 zero bits are encountered, it is interpreted as a 0.

7. Execute 11 instructions with the command “p b”. This instruction is the start of a loop. How many times will this loop run?
This loop will run 10 times. The counter is set to 0Ah, which is 10 in decimal.

8. Execute all instructions up until the functions return value with pt. What is the decimal value returned by the function?
The return value in x86 is store in the EAX register. The 7a69h is 31337 in decimal, or “elite” in l33t sp34k.
After the lab, we covered how to take control of a program by manipulating the stack. We want EIP to point to an address where our code exists. So we need to find how many bytes between our buffer and the return address on the stack. In order to figure out how to find how big the offset it, we can use JavaScript. Using the metasploit pattern variable to overwrite EIP, we can use the byakugan module to determine the length of the offset. Next, we need to position our executable shell code into the memory of the program. One way is to create a string with a bunch of NOP operations, our shell code, then a return address and try to guess the address. But this is not a very reliable method since we’re literally guessing. Another way is to write filler into the stack until the return address, then our shell code. We know that after we return and EIP gets overwritten, ESP points to our shell code. We don’t know the value of ESP but we know that it points to our code. Now we just need to find a jmp ESP instruction anywhere in the code (ffe4) and replace the return address with the address of this instruction. Now, after the function returns, it will start execute our code right off the stack. However, on modern operating systems, this exploit won’t work because because there are protections to prevent code from being executed off the stack.
Week 3 Write Up
This week’s first lab was about finding commonalities between known malware samples. The tools we used were FileInsight and Yara. FileInsight, a tool we were introduced to last week, is a tool that allows us to see the hex contents of an executable file.
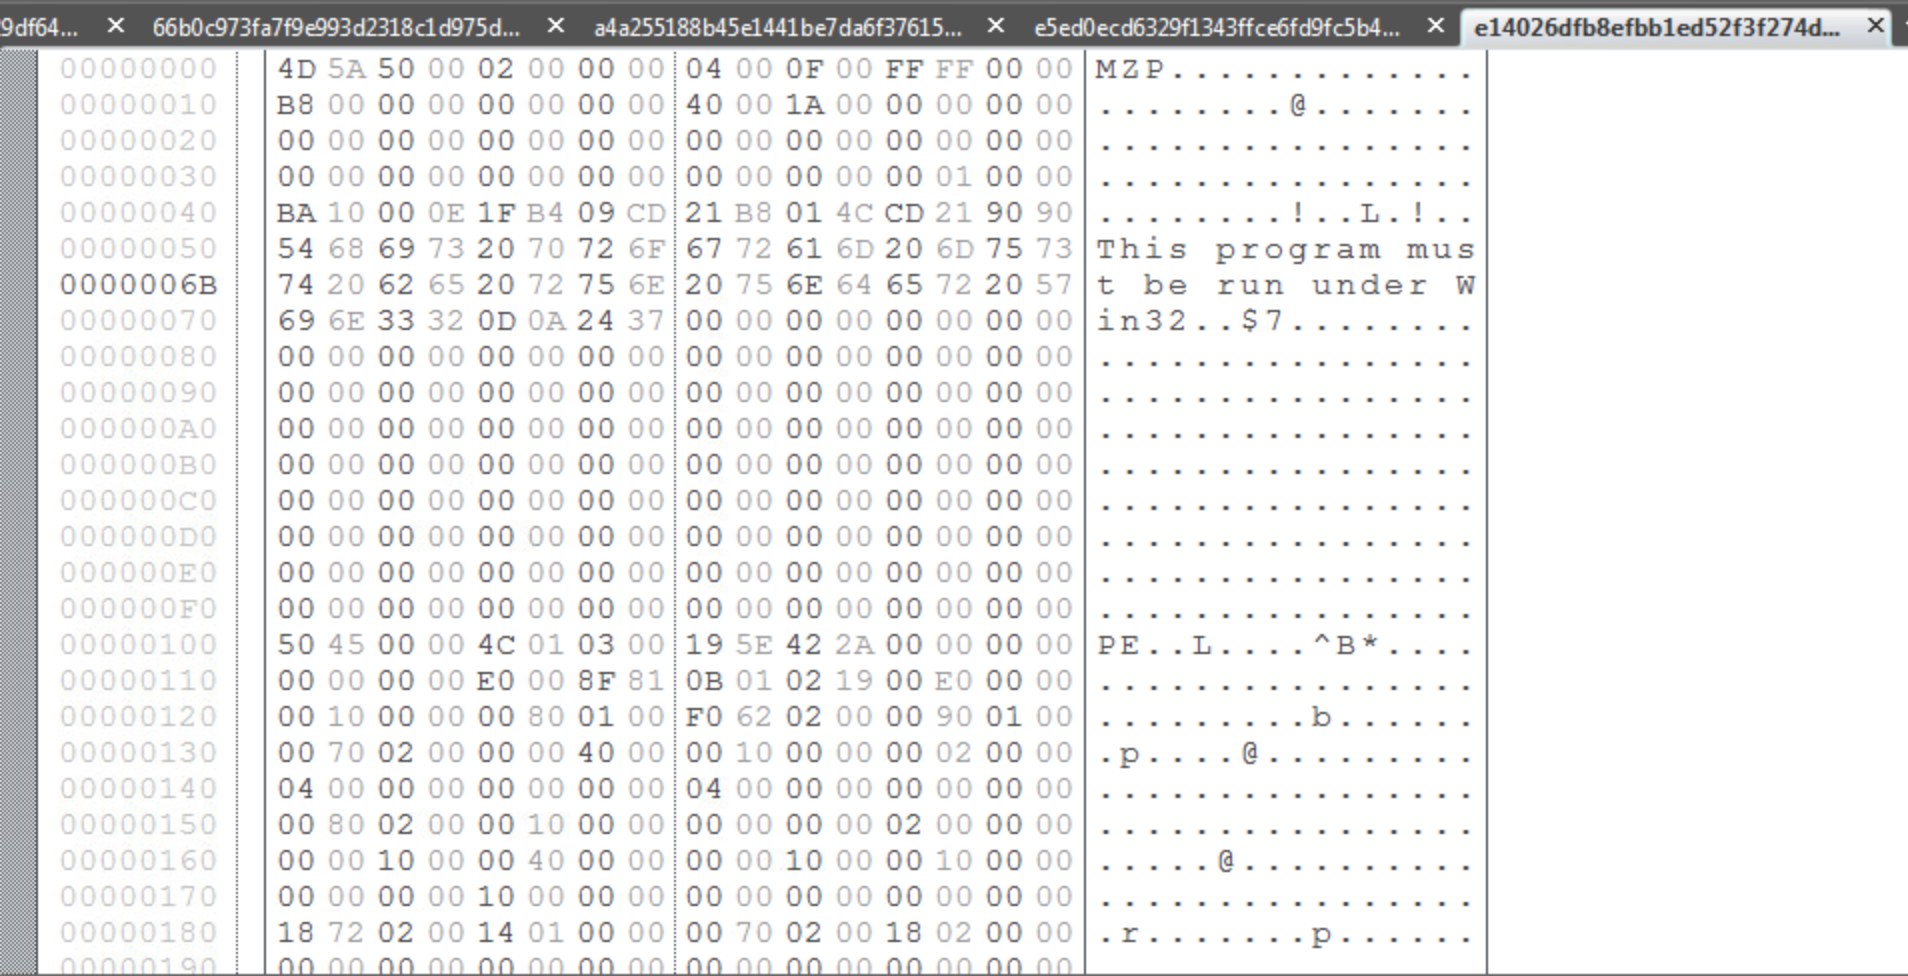
There are two plugins for FileInsight called Strings and StringsAll that produce lists of strings within the executable. The difference between the two is that Strings will only produce a list of strings containing a minimum of 7 characters and StringsAll produces a list of strings with a minimum of 2 characters. For the purposes of this lab, I chose to use the Strings plugin because it made the list of possible strings more manageable and it would be hard to determine which of the many 2-3 character strings from StringsAll were significant to the malware.
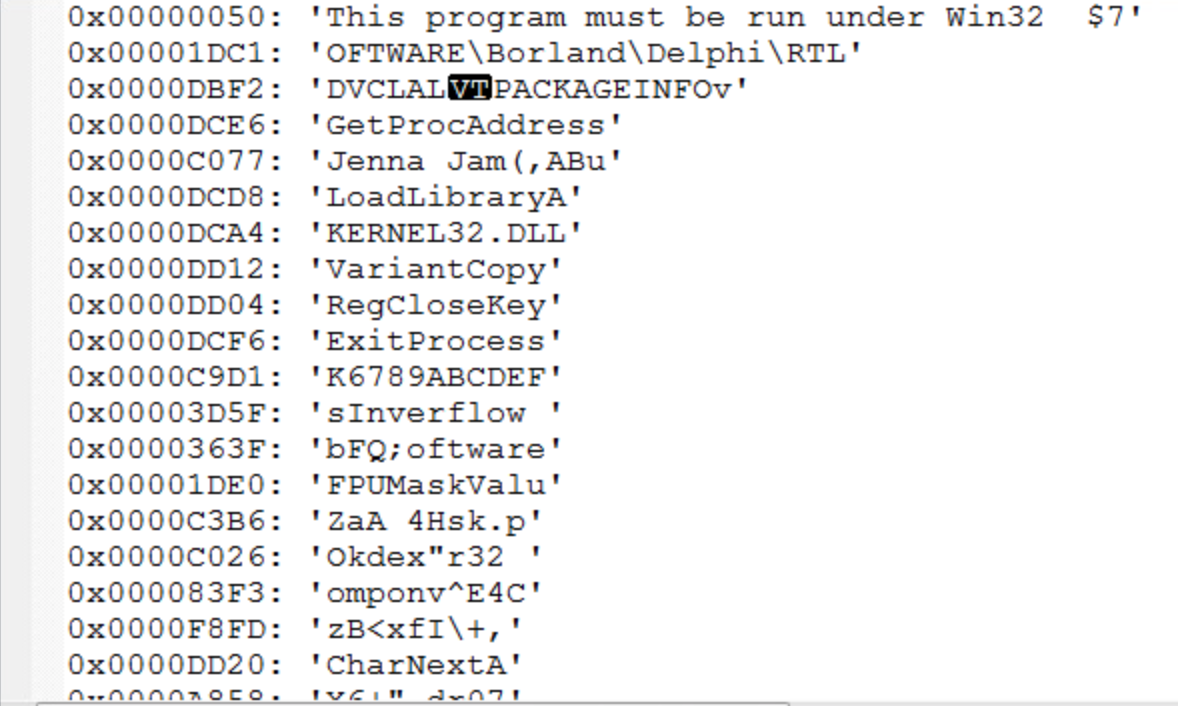
From this list of strings, it is our job to determine which are indicative as malware and which are common to the other malware samples so that a YARA rule can be written to classify the malware. Since I do not have much experience with identifying strings common to malware, I used a quick Google search to determine if any of these strings are common to known malware. Another possibility is that the strings found are for common windows files. For instance, KERNEL32.DLL is a standard dynamic link library for the Windows OS kernel. While the malware might be operating on this file in some way, it’s presence in the sample is not enough on it’s own to identify it as malware. This also goes for something like LoadLibraryA, which I found out is a Windows libloaderapi.h function call. This also would not be unique to a malware sample.
After analyzing the strings from each sample, I used the YARA editor to check which strings were common to all files in the sample by writing a YARA rule. It was tempting to include “Borland” or “Delphi” in my rule, since all samples included it, however it would not necessarily indicate that the sample was malware since Borland Delphi is a legitimate programming language although a lot of malware is written using that language. The two strings that I used for my rule were “Jenna Jam” and “FPUMaskValu”.

This was the YARA rule I came up with for the Sytro samples given to us.

After going through this lab, it was apparent that making these manual comparisons was very inconvenient. In the class lectures, it was mentioned that this process of analyzing samples and finding comparisons could be automated. In the real world, when analyzing new samples, we don’t know if the sample is clean or dirty. One of the new approaches discussed in lecture to better analyze these samples is to train a machine learning algorithm with categorized samples and then have it categorize new samples. But there are also disadvantages of automating categorization, especially with a white-list approach. While there are 300 million malware samples collected at McAfee so far, the number of white-listed files is even larger and they must be categorized. In addition, malware can be VM-aware so that when analyzed in a sandbox it is not detectable.
Our lab from the second set of lectures covers the Cuckoo tool. Cuckoo is tool that allows a host system to control a virtual network of VM’s that analyze malware samples and report the results to the host. In the demo of Cuckoo we worked through in the lecture. We analyzed the original malware sample from our first Lab in week 1 using Cuckoo. In the cmd prompt, we navigated to the analyzer directory and ran analyzer.py then fakenet.exe. This created some logs in the C:\Cuckoo directory.

For the final lab, we were given four different samples and tasked with using the tools available to confirm that at least one of the files is malware. The sample that I found to be malware was A187…B303.

This is the CSV output of the cuckoo logs for A187…B303. It creates the ntshruis.dll file in a temp folder and opens the print.exe it also created in the same temp folder.

A batch file is also created in the same Temp directory called Deleteme.bat. The batch file is executed and deleted. A subsequent check of the Temp directory reveals that Deleteme.bat is no longer present.

One of the files created by the sample in the …/AppData\Local\Temp\ directory is ntshruis2.dll. A quick google search for this file name reveals that this dll is a known variant of Win32/Packed.VMProtect.AAN. It is also packed, which the lectures note is suspicious.
Ben Jones’s CS 373 Blog
Week 2- Advanced Forensics
This week in CS 373 we covered forensic computing. At a high-level, forensics is the process of collecting useful evidence from a computer in order to assist with a case or investigation. Types of cases that would require computer forensics include: fraud, theft of intellectual property, hacking/data theft, inappropriate use of the internet, and child exploitation. Because these are often legal cases, careful attention needs to be paid to how this evidence is collected, analyzed, and presented in order for the evidence to be admissible in court. For example, an investigator who has retrieved an email address and password from a memory dump could not access that email without providing justification for its relevance to that particular investigation and getting approval from a judge first.
There are different categories of forensics: live, post-mortem based, network based, and xbox/playstation forensics. Live forensics deals with systems that are currently running and can include investigation of memory containing information on currently running processes. Memory is volatile, so information can be lost if the computer is powered down before the live state can be analyzed. Sometimes investigations can take place in dangerous situations where live analysis cannot be performed. In this case, if the computer was transported to a secure location, then post-mortem based forensics could be performed. There is still information that can be retrieved, but information about live processes and in RAM will be lost. Interestingly, it was mentioned in the lecture that computers and RAM can be literally frozen in order to save the state of the RAM without power. The last type of forensics, xbox and playstation, is important to mention because there are so many devices and people use them to communicate via voice or text messages. Gaming consoles require a different set of skills and tools to analyze but can provide useful evidence in a case.
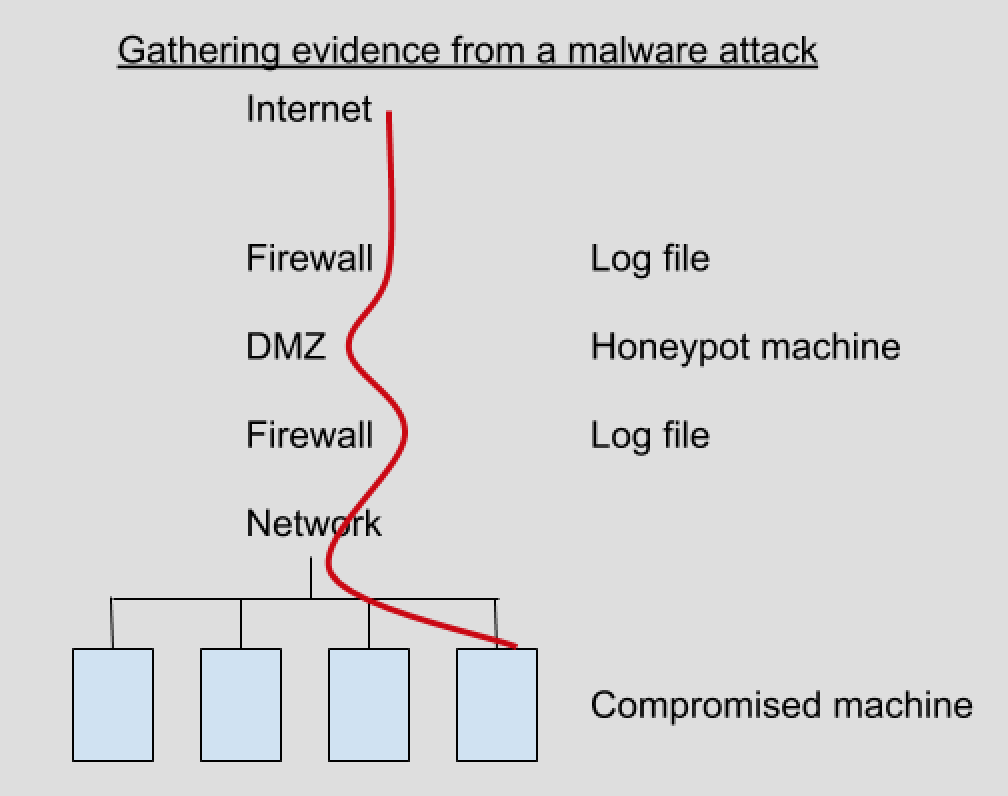
But what qualifies as computer forensic evidence? Evidence can be found in many different places: operating system, network, memory, removable media, applications, and databases. Anything that can be used to prove or disprove a fact is evidence, whether that is a registry file, system or sql log file, or database information. The lecturer emphasized the concept of triage- proving a conclusion using evidence from multiple places.
Evidence must be handled in such a way to maintain its integrity. The investigator must prove that the evidence was gathered in an appropriate way and that it has not been tampered with. An example of this would be creating a copy of the hard disk and then comparing the hash of the original disk with the copy. If the hashes are the same, then the integrity of the evidence has been maintained. To prevent the computer copying the disk from writing to it, a device called a write blocker can be used.

However, there are challenges to collecting evidence and building a case. There is a huge amount of data to sift through. Decades ago, a case may only have 20 – 40 GiB of hard drives to analyze, but now this can get into terabytes of data. Out of all that data, where do we look to find evidence that is relevant to our case? How do we determine what is useful and what is not? Another challenge is establishing a normalized timeline of events. If multiple computers are involved, their clocks may not be synced and it can make the events hard to position relative to one another. There are multiple log formats that need to be wrangled- although some security incident and event management tools have log parsers that can be used to make this task easier. Finally, it is always possible that the attacker still has remote control of the system. While you are performing a live investigation, the attacker could be covering their traces or attempting to foil your investigation if there is a live network connection.
One of the concepts stressed this week was the Order of Volatility. Items near the top are more volatile – less permanent – and should be collected before items near the bottom.
1. System memory
2. Temporary File Systems
3. Process Table / Network Connection
4. Network Routing & ARP cache
5. Forensics acquisition of disks
6. Remote logging & monitoring data
7. Physical configuration and network topology
8. Backups
The first lab this week used FTK imager to create a memory dump. The instructor emphasized a couple important points about creating memory dumps and maintaining the suspect system integrity. One, don’t install any tools of the suspect’s machine. Two, always write your memory dump to external media and not on the suspect’s machine. One of the cool features of FTK imager is that you can copy out the master file table. This is not something that you can do in live forensics because it is used by the operating system. The master file table contains information about every file and directory.
Why are memory dumps useful? Memory contains information about running processes. We can search memory for strings, reconstruct data structures, and search for static signatures of kernel data structures.
The second lab this week used Volatility to analyze the memory dump we created with FTK imager as well as a variety of plugins used to analyze specific aspects of the memory dump. The first plugin, imageinfo shows us information of what operating system the memory dump is from. The operating system is important and must be passed in as a parameter to additional plugins in order to interpret the memory correctly. psscan is a plugin that allows us to see process information and lists process ids and parent ids for processes. We can use this information to trace the origin of processes. For example, we can see evil.exe in the list of processes and see what process spawned it . dlllist can be used to retrieve information about the windows dlls in memory.
Finally, one of the last topics covered that I was not familiar with previously was the structure of the Windows Registry. The Windows Registry contains information about nearly everything that happens on the computer. There are 5 hives in the registry starting with the prefix ‘HKEY’. There are two main registries: HKEY_USERS(HKU) and HKEY_LOCAL_MACHINE(HKLM). The other three hives link to directories inside the two main hives. The registries contain information that can be useful for forensic investigation such as Internet explorer history and passwords or modifications to autorun. Also, once the timeline of events is established, the registry can be cross examined to see what happened on the machine when other known events occurred. This is an example of using triage.
Week 1- Basics of Malware
This is my first course covering computer security topics, so a lot of what we covered this week was completely new to me. Conceptually, the topics and definitions introduced were straightforward, but the lab was challenging for me because there were many new tools to learn and I am not as familiar with Windows and Mac and Linux.
One of the interesting takeaways, though not necessarily surprising, is the human element to computer security. We hear about creating more secure passwords or adopting more secure encryption, but many attacks rely on the user’s fallibility. All those technical protections won’t matter if a password can be phished. The lecturer also mentioned how effective dropping usb sticks with malware in a target company’s parking lot could be – someone is bound to eventually plug one in out of sheet curiosity.
Having heard about some types of malware threats, it was helpful to go over definitions for the major types of malware. For example, one of the new types of malware I learned about was a bootkit virus. A bootkit virus infects the master boot record on the physical motherboard of a computer. The fact that it exists outside the operating system’s file system means that it cannot be detected by system processes. Another new thing I learned about ransomware was that instead of threatening to publish private information, some attackers will encrypt a target system with a private key that only they know to effectively lock down the system for the user.
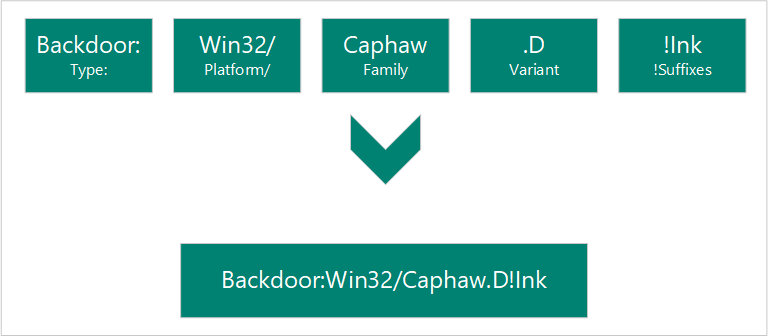
Another thing we covered this week was the naming convention for malware. The full name of the malware contains information about the type of malware, platform affected, family (contains similar PE artifacts), variant, and suffixes.
Conventions for transferring malware were also covered. I learned that typically, a malware sample is zipped with the conventional password “infected”. Gmail prevents zip files with the password “infected” from being sent, but the instructor mentioned that a workaround to this is just changing the password from infected.
The second part of lecture covered APTS and forensic, static, and code analysis of malware.
APT is an acronym for Advanced Persistent Threats. Advanced refers to an attacker that is familiar with cyber intrusion techniques and capable of writing custom exploits depending on their target. Persistent means that the attacker is working over a long period of time to achieve their goals. Since there is potential financial gain from exploiting company or government hosts, cyber crime organizations have become more organized and sophisticated in order to achieve their goals. These organizations can be formed by governments, criminal organizations, or even by competing businesses.
Forensic analysis examines contextual clues to learn more about the attacker. Evidence can be from the client submission, similarities to other attacks, or anecdotal details about the attack. For example, finding a username in the malware that can be traced to online forum accounts could give additional information about an attacker.
Static analysis is when malware is examined without seeing the actual coded instructions. One technique that can be used in static analysis to learn more about the malware sample is uploading the sample to VirusTotal and looking for information about the sample. If the sample is confidential, looking up a sample’s checksum on VirusTotal can also reveal information about the malware without revealing any confidential information. Another static analysis technique is looking up strings in the executable. There is a windows tool that will analyze a .exe file and show a list of strings present in the executable. For example, a piece of malware that copies credit card numbers may have a string in it with the regular expression for matching credit card numbers.
